To always face my abversity head on. ——《冰雪奇缘2》
永远都要直面挫折。
抓取目标
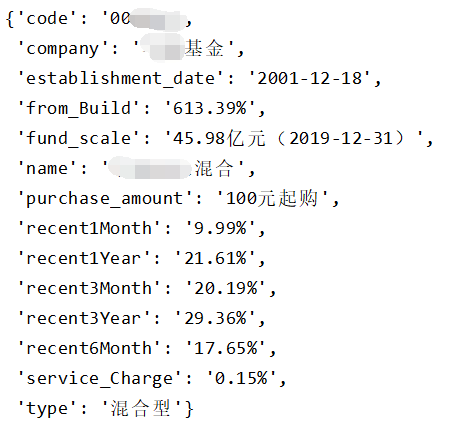
本次抓取目标是天天基金网的基金数据,如基金代码、基金名称、最近一个月收益率、最近六个月收益率、最近三年收益率以及基金公司、基金规模等一系列指标,这些信息抓取之后将会保存到本地的CSV文件中。
思路分析
我们选取的站点是:http://fund.eastmoney.com/allfund.html 如下图示:


可以看出所有的基金所有的基金代码以及基金名称都在这里,但是我们想要的不止这些,所以需要进入到每一个基金的详情页去。如下图:

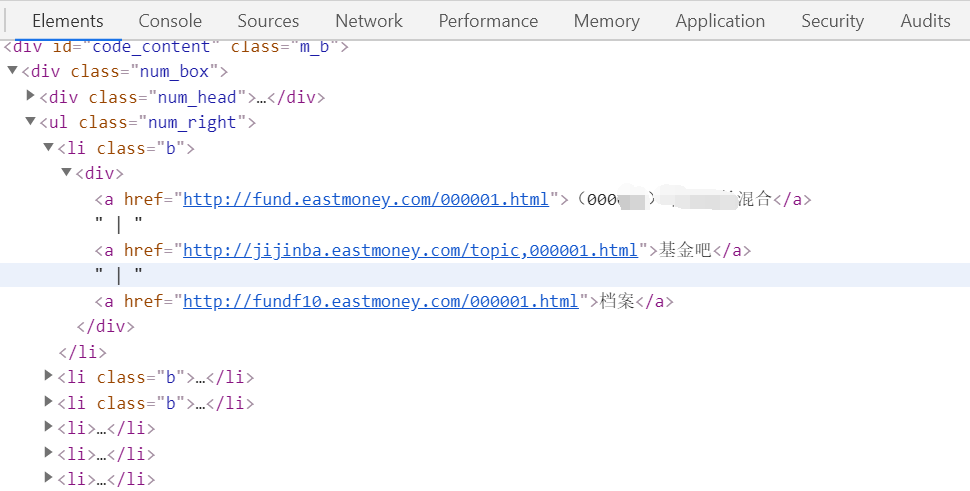
那我们就以我们选取的站点:http://fund.eastmoney.com/allfund.html 为起始站点,提取每个基金的详情页链接,然后在详情页中解析我们想要的数据。
新建项目
接下来,我们用Scrapy来实现这个抓取过程。首先创建一个项目,命令如下所示:
1
| scrapy startproject fund
|
进入项目中,新建一个项目,名为eastmoney,命令如下所示:
1
| scrapy genspider eastmoney fund.eastmoney.com
|
我们先修改spider,实现start_requests()方法,然后用parse_info()进行解析。如下所示:
1
2
3
4
5
6
7
8
9
10
11
12
| import scrapy
class EastmoneySpider(scrapy.Spider):
name = 'eastmoney'
allowed_domains = ['fund.eastmoney.com']
start_urls = ['http://fund.eastmoney.com/allfund.html']
def parse(self, response):
urls = response.xpath('//*[@id="code_content"]/div/ul/li/div/a[1]/@href')
for url in urls:
url = response.urljoin(url.extract())
yield scrapy.Request(url,callback=self.parse_info)
|
创建Item
接下来,我们解析基金详情页我们需要的信息并生成Item。如下所示:
1
2
3
4
5
6
7
8
9
10
11
12
13
14
15
16
17
| import scrapy
class FundItem(scrapy.Item):
code = scrapy.Field()
name = scrapy.Field()
service_Charge = scrapy.Field()
purchase_amount = scrapy.Field()
recent1Month = scrapy.Field()
recent3Month = scrapy.Field()
recent6Month = scrapy.Field()
recent1Year = scrapy.Field()
recent3Year = scrapy.Field()
from_Build = scrapy.Field()
type = scrapy.Field()
fund_scale = scrapy.Field()
establishment_date = scrapy.Field()
company = scrapy.Field()
|
提取数据
开始解析基金详情页,实现parse_info()方法,因为详情页的布局并不是统一的,所以用到了try except, 如下所示:
1
2
3
4
5
6
7
8
9
10
11
12
13
14
15
16
17
18
19
20
21
22
23
24
25
26
27
28
29
30
| from fund.items import FundItem
def parse_info(self, response):
item = FundItem()
try:
item['code'] = response.xpath('//*[@class="fundcodeInfo"]/span[1]/text()').extract()[0]
except:
item['code'] = response.xpath('//*[@class="fundDetail-tit"]/div/span[2]/text()').extract()[0]
item['name'] = response.xpath('//*[@class="fundDetail-tit"]/div[1]/text()').extract()[0]
item['service_Charge'] = response.xpath('//*[@class="buyWayStatic"]/div[5]/span[2]/span[2]/text()').extract_first('暂停申购')
item['purchase_amount'] = response.xpath('//*[@id="moneyAmountTxt"]/@data-placeholder').extract_first('暂停申购')
try:
item['recent1Month'] = response.xpath('//*[@class="dataItem01"]/dd[2]/span[2]/text()').extract()[0]
item['recent3Month'] = response.xpath('//*[@class="dataItem02"]/dd[2]/span[2]/text()').extract()[0]
item['recent6Month'] = response.xpath('//*[@class="dataItem03"]/dd[2]/span[2]/text()').extract()[0]
item['recent1Year'] = response.xpath('//*[@class="dataItem01"]/dd[3]/span[2]/text()').extract()[0]
item['recent3Year'] = response.xpath('//*[@class="dataItem02"]/dd[3]/span[2]/text()').extract()[0]
item['from_Build'] = response.xpath('//*[@class="dataItem03"]/dd[3]/span[2]/text()').extract()[0]
except:
item['recent1Month'] = response.xpath('//*[@class="dataItem01"]/dd[1]/span[2]/text()').extract()[0]
item['recent3Month'] = response.xpath('//*[@class="dataItem02"]/dd[1]/span[2]/text()').extract()[0]
item['recent6Month'] = response.xpath('//*[@class="dataItem03"]/dd[1]/span[2]/text()').extract()[0]
item['recent1Year'] = response.xpath('//*[@class="dataItem01"]/dd[2]/span[2]/text()').extract()[0]
item['recent3Year'] = response.xpath('//*[@class="dataItem02"]/dd[2]/span[2]/text()').extract()[0]
item['from_Build'] = response.xpath('//*[@class="dataItem03"]/dd[2]/span[2]/text()').extract()[0]
item['type'] = response.xpath('//*[@class="infoOfFund"]/table/tr[1]/td[1]/a/text()').extract()[0]
item['fund_scale'] = response.xpath('//*[@class="infoOfFund"]/table/tr[1]/td[2]/text()').extract()[0].split(":")[1]
item['establishment_date'] = response.xpath('//*[@class="infoOfFund"]/table/tr[2]/td[1]/text()').extract()[0].split(":")[1]
item['company'] = response.xpath('//*[@class="infoOfFund"]/table/tr[2]/td[2]/a/text()').extract()[0]
yield item
|
数据储存
最终我们的数据是要储存到本地的CSV文件中。我们在这里实现ToCSVPipeline类,如下所示:
1
2
3
4
5
6
7
8
9
10
11
12
13
14
15
16
17
18
| import csv
from fund.items import FundItem
class ToCSVPipeline(object):
def __init__(self):
self.f = open("fund.csv", "a", encoding='utf-8', newline="")
self.fieldnames = ["code", "name", "service_Charge", "purchase_amount", "recent1Month", "recent3Month", "recent6Month",
"recent1Year", "recent3Year", "from_Build", "type", "fund_scale", "establishment_date", "company"]
self.writer = csv.DictWriter(self.f, fieldnames=self.fieldnames)
self.writer.writeheader()
def process_item(self, item, spider):
self.writer.writerow(item)
return item
def close(self, spider):
self.f.close()
|
设置随机UA
我们需要做一些防范爬虫的措施才可以顺利完成数据爬取。在Middleware中设置随机User-Agent。
1
2
3
4
5
6
7
8
9
10
| from fake_useragent import UserAgent
class UseAgentMiddleware(object):
def __init__(self, user_agent=''):
self.ua = UserAgent(verify_ssl=False)
def process_request(self, request, spider):
if self.ua:
random_ua = self.ua.random
request.headers["User-Agent"] = random_ua
|
fake_useragent可以随机生成User-Agent,但是这个库是需要安装的,安装命令如下:
1
| pip install fake-useragent
|
具体的其他方式使用有兴趣的可以度娘一下。
配置setting
首先我们需要关闭robots规则,否则是无法爬取数据的;我们还需要将Pipline管道以及middleware开启,不然的话,我们设置的储存方式以及随机UA就没有办法使用了。具体如下所示:
1
2
3
4
5
6
7
8
9
| ROBOTSTXT_OBEY = False
DOWNLOADER_MIDDLEWARES = {
'fund.middlewares.UseAgentMiddleware': 300,
}
ITEM_PIPELINES = {
'fund.pipelines.ToCSVPipeline': 300,
}
|
运行
到此为止,整个爬虫就实现完毕了。我们在项目根目录下运行如下命令启动爬虫:
输出部分结果如下所示:

运行一段时间后,我们便可以在项目根目录下下看到CSV文件了,爬取的数据如下图所示:

代码地址
https://github.com/Mrxiuxing/Spider/tree/master/fund


